
Water Softener Installation Diagram: Where It Goes and How It Connects
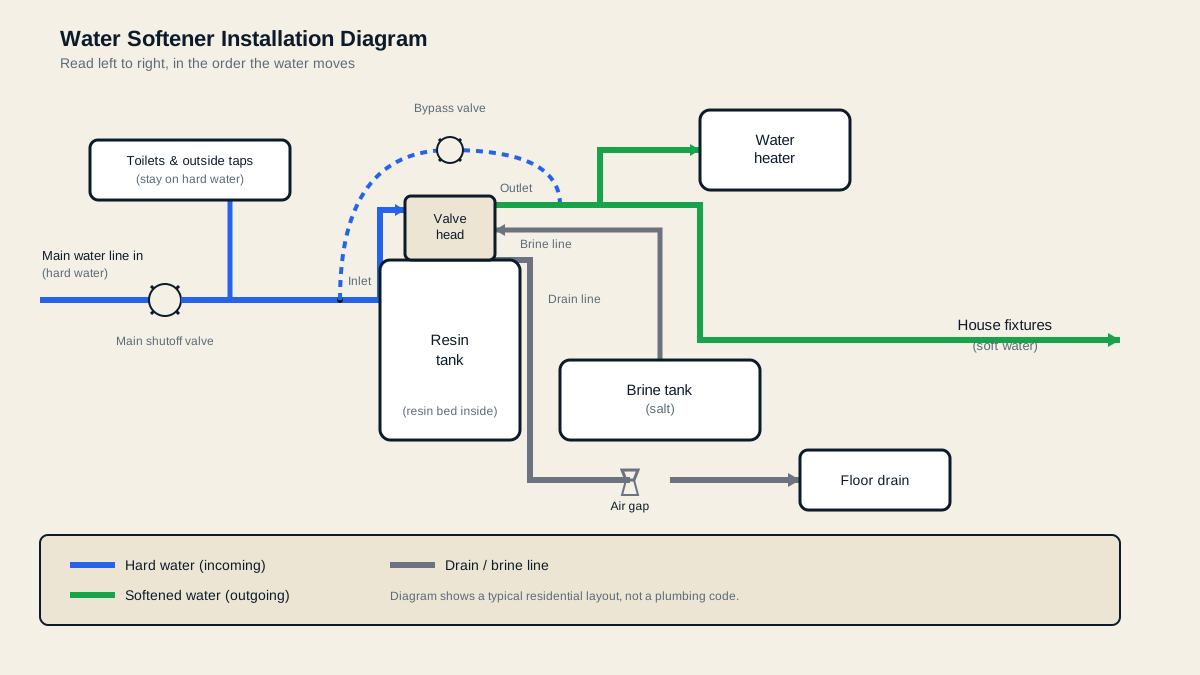
A water softener installation diagram looks busy. The job it shows is simple. Cold water comes in from the main line. It runs through the softener. Softened water goes out to the house. A drain line carries the rinse water away. A second tank sits beside it and holds the salt. Everything else on the page is a detail.
For a look at the parts inside the unit itself, see Water Softener System Diagram: Every Part, in Plain Words.
Read the drawing in the order the water moves
Start at the inlet. That pipe carries the hard water into the house, and it is the water you want to change.
It enters the tank and passes through a bed of resin. The resin is the part that does the softening.
The softened water leaves by the outlet and goes on to the house.
Then there is a third pipe, and it is the one people miss. That is the drain line. The Building America Solution Center describes what leaves through it. That guide is run by the Department of Energy. The brine, plus the calcium and magnesium the resin picked up, is flushed out through a drain pipe.
The salt tank sits next to the main tank. You keep salt in it. One maker's own guidance gives the test for how much: the salt level should stay above the water line inside that tank.
Put the softener before the water heater
One placement rule shows up on almost every diagram, and there is a plain reason for it.
The softener goes in the line ahead of the water heater. The cost guide Fixr states this directly for tankless heaters. The system is installed alongside the heater to soften the water before it goes through the heater.
Read that as an order, not a location. Water reaching the heater has already been through the softener. Flip the order and the heater keeps taking hard water.
You will also see the softener drawn close to the point where water enters the house. We looked for a primary source that sets an exact distance from the meter. We did not find one, so we are not going to give you a number for it.
The drain line is not optional
A softener has to rinse itself out. Penn State Extension puts a real number on that rinse. About 50 gallons of water are used for each cleaning cycle.
All of that water has to go somewhere, and the diagram shows it leaving by a drain pipe.
So look at your drain before you look at your softener. A tank with nowhere to rinse is a tank you cannot run.
The lines you leave on hard water
Not every tap in the house needs softened water, and the diagram usually shows that.
Penn State Extension makes the point plainly. The simple plumbing of a softener makes it easy to bypass toilets and outside taps. Those fixtures sit on the hard side of the drawing.
There is one more line worth marking. Nebraska Extension describes a cold water line run to the kitchen tap that skips the softener. That leaves the house one tap of untreated water for drinking and cooking.
Decide all of this before anyone cuts a pipe. It is a small job now and a bigger one later.
The bypass valve is already on the drawing
Most diagrams show a valve bridging the inlet and the outlet. That is the bypass. Open it and the water skips the tank and carries on to the house.
You will usually not have to buy one. One maker in our table lists standard 1 inch plumbing connections and a built-in bypass valve. A second maker's install kit ships with the bypass valve already fitted. A third names a bypass valve in the parts list that comes in the box.
So when a diagram draws a bypass, it is normally drawing a part you already own.
What actually comes in the box
Diagrams show parts. Boxes hold them, and the two lists are worth reading side by side.
One maker describes the whole delivery in a single line. Everything arrives in one box: resin tank, brine tank, valve head, drain line, and all fittings.
Another maker's parts list names the bypass valve. It also names a riser pipe and a bottom strainer, both already fitted inside the resin tank.
Anything the diagram shows that the box does not hold is a trip to the store. Better to find that out now than halfway through a Saturday.
What a diagram will not tell you
A drawing is not a plumbing code, and it is not a permit.
We could source only one placement rule, and that is the one about the heater. Nothing we found sets a required spot in the line measured from the meter.
We also could not find a single standard layout for bypass lever positions. Makers differ here. Read the manual that came with your own unit rather than a drawing you found on the internet.
If that gives you pause, the instinct is a good one. This is wet work on a live main, and the drain run is the part that catches people out.
Build your own install estimate, part by part, before you call anyoneQuestions people ask
Still deciding which softener to buy? Our pick is the Crystal Quest whole house softener. It holds 45,000 grains. It filters your water on the way in. It filters again on the way out. The standalone system costs $1,531.00. One system in our table costs less and scores higher. Compare both before you spend. Check the price.