
Water Softener System Diagram: Every Part, in Plain Words
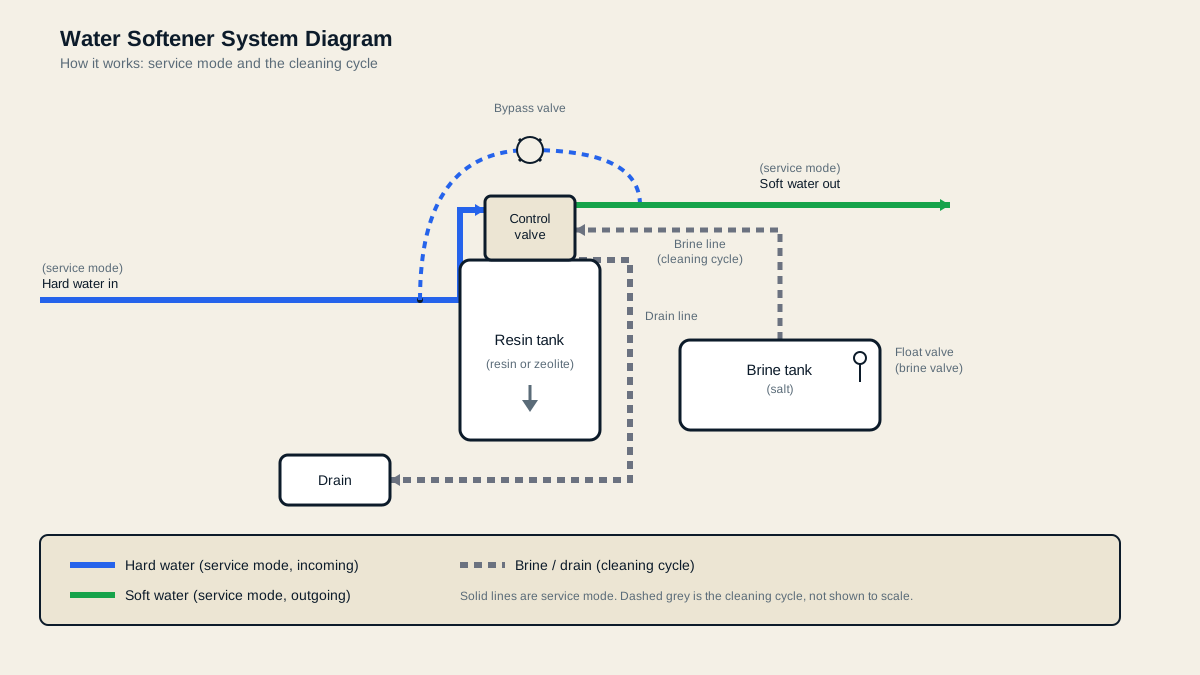
A water softener system diagram labels the parts of the machine and shows how water moves through them. One maker's own labeled photos name five: the resin tank, the brine tank, the control valve, the bypass valve and the float valve. Learn those five names and any spec sheet gets easier to read.
Why the diagram matters more than the picture
You are not looking at a diagram because you like drawings. You are looking because a manual or a spec sheet used a word you did not know.
So we are going to skip the artwork and go through the parts. Each one has a job, and each one shows up on the paperwork you sign.
One thing to know up front. We looked for a single labeled drawing from a public source we could point you at. We did not find one. What follows is put together from two state extension guides and one maker's own labeled product photos.
The resin tank, where the water changes
This is the tall tank, and it is the reason you bought the machine.
Penn State Extension describes what happens inside. The water is filtered through an exchange media known as resin or zeolite. That media is the bed of small beads the tank is packed with.
On a diagram this part gets called the resin tank or the mineral tank. Both names mean the same vessel. Hard water goes in one end and soft water comes out the other.
The brine tank, where the salt lives
Next to the tall tank sits a shorter one with a lid. That is the brine tank, and it is the one you open.
The salt you pour in mixes with water to make brine. The machine uses that brine to wash the resin clean again.
It needs a look now and then. Nebraska Extension says the brine tank requires periodic checking and cleaning. That is the part of ownership people forget until the water goes hard.
The float valve, the part inside the salt
Look inside the brine tank and you will find a small assembly standing in the salt.
On a diagram it is labeled the float valve or the brine valve. Its job is to stop the tank from taking on too much water.
Nebraska Extension gives it a schedule. It says the brine valve and float assembly, if used, should be cleaned and inspected at least once a year. Put it on the calendar with the smoke alarms.
The control valve, the brain on top
The control valve sits on the head of the resin tank. On a maker's labeled photo it is called exactly that.
It decides which mode the machine is in. In service mode your water passes through the resin and gets soft. In the cleaning cycle the brine is drawn in and the waste goes to the drain.
Everything you set, you set here. The clock, the hardness number and the cycle all live in this part.
The bypass valve, your off switch
The bypass valve is the fitting behind the unit where the pipes connect.
One maker's parts photos label it the bypass valve, and it comes in the box. Turn it and the water skips the softener and runs straight through to the house.
That is what you use when the machine needs service. It is also what you use when you want hard water at the tap for a while. Find it now, before you need it in a hurry.
The diagram is also your warranty map
Here is the part most shoppers miss, and it is worth real money.
Coverage is not one number for the whole machine. It is written part by part, using the same names as the diagram.
One maker in our table publishes its terms that way. Its resin tank carries a 10-Year Warranty. On the same unit, the control valve carries a 5-Year Warranty.
So the brain of the machine is covered for half as long as the tank it sits on. That is not a scandal, and it is normal enough. It is just something to know before you assume one number covers everything.
Read the terms by part, not by headline. When a page says a long warranty, find out which part earns it.
How to use this on a spec sheet
Open any spec sheet with these five names in your head.
Find the resin tank and look for its grain capacity. Find the control valve and look for how it decides to run a cycle. Find the brine tank and check its salt capacity. Check that a bypass valve is included, because you will want one. Then read the warranty line for each of those parts, not just the biggest number on the page.
That is the whole diagram, in the order it will matter to you.
Read two spec sheets side by side, part for partQuestions people ask
Still deciding which softener to buy? Our pick is the Crystal Quest whole house softener. It holds 45,000 grains. It filters your water on the way in. It filters again on the way out. The standalone system costs $1,531.00. One system in our table costs less and scores higher. Compare both before you spend. Check the price.